In today’s world of changing dietary habits and sedentary lifestyle, obesity or being overweight seems to be the concern of every other household.
Gaining those extra pounds seems so easy while, losing them can be a real challenge for some people.
Strenuous workout sessions and investing great amount of time and money in gym and weight loss sessions is not everyone’s cup of tea.
For those people who just can’t go through those rigorous exercises, yoga provides a better and more easy alternative. Apart from helping in burning those extra calories, it also gives a stress-free and peaceful mental experience.
How does fat accumulate in the body?
There are two types of fats in human body. One is the Essential fat, which is required by body for various functions, while the other is the Storage Fat, which is the excess fat produced when the body gets more calories than it actually needs at its present level of physical activity.
It could also be as a result of stress, lack of exercise or a symptom of an underlying health condition.
This fat gets stored in body either within the abdominal cavity (abdominal/ visceral fat) and pads the spaces between our abdominal organs, or between the skin and muscles (subcutaneous fat) and is the main cause of weight gain.
The position of fat accumulation greatly depends on hormones and genetics.
The stored fat in the body leads to several health concerns such as obesity, metabolic disturbances, increased risk for cardiovascular diseases and type 2 diabetes. It also leads to disruption of normal balance and functioning of body hormones. In women it can be related to breast cancer and need for gall bladder surgery.
Exercise and diet play a key role in controlling fat accumulation and also yields other benefits such as lower blood pressure and regulated cholesterol levels.
Experts suggest regular physical activity or exercise of a moderate intensity to reduce weight and burn off the excess calories . And what better exercise for it than yoga.
Yoga helps you get in shape and freshens you up. It acts upon the mind, body and breath simultaneously, which makes it much more easy to do and effective, as compared to other workouts.
According to a study conducted at the Preventive Medicine Research Institute in Sausalito, California, it was found that regular yoga and meditation, combined with exercise and controlled diet, was more effective in weight loss, than a regime with exercise and healthy diet, without yoga.
Another paper boasts of Yoga’s effectiveness in weight maintenance, prevention of obesity, and decrease in risk factors of obesity related ailments.
20 Best Traditional Yoga Poses For Weight Loss
Here are 20 Best Yogas that will help you watch your weight scale and your waistline.
1.Chair Pose: Utkatasana
How to do it:
- Stand straight with feet together.
- Raise both arms in air towards the ceiling, parallel to each other. Lower the hips, while bending the knees. The body weight should concentrate on your heels.
- The hips should be lowered such that it gives the appearance of sitting on a chair.
- Lift the chest and head up, gazing towards the fingers.
How much should be done: Stay in the chair pose for 30-60 seconds taking deep inhalations and exhalations.
How it helps: It strengthens the core, lower body, buttocks and the mind.
Precautions: Take caution if you have back injury.
Watch it Here:
2.Revolved Chair Pose:Parivrtta Utkatasana
How to do it:
- Begin by doing the Chair pose.
- While lifting arms above, inhale.
- Then exhale, lower the arms and turn such that the left elbow touches the right thigh.
- Join the palms together. Your right elbow should be lifted up and should rest firmly on the left one.
- Raise the sternum.
How much should be done: Maintain the pose for 30-60 seconds. Return to chair pose and repeat by reversing the sides.
How it helps: It helps in strengthening the core, buttocks and aids in digestion.
Precautions: Take caution if you have back injury.
Watch it Here:
3.Triangle Pose: Trikonasana
How to do it:
- Stand straight and pull both feet 3.5-4 feet apart.
- Turn right foot by 90 degrees and left foot by 15 degrees. You body weight should be balanced on both feet. Inhale.
- Exhale and bend towards right without bending your back such that your right hand touches your shin or foot.
- Extend your left up towards the ceiling keeping it straight.
- Gaze towards the left palm, stretching fully and take deep breaths.
How much should be done: Do the Pose for 30-60 seconds
How it helps: It straightens knees, legs, arms, chest and ankles and strengthens shoulders, hips, hamstrings, spine and calves.
Precautions: In case of back injury or neck injury, migraine, headache or diarrhea, proceed with caution.
Watch it here:
4.Plank Pose
How to do it:
- Begin on all fours.
- Press both palms towards the floor, and pull the feet back. The distance between knees should be equal to hip width, while distance between palms should be more than shoulder width.
- Keep your arms straight and pull the belly in towards the spine.
How much should be done: Stay in this position for 30-60 seconds.
How it helps: It strengthens the shoulders and core. It stimulates muscles of abdomen and legs. It engages all muscles as you are trying to resist gravity and thereby reduces calories.
Precautions: Do not perform this if you have wrist injury.
Watch it Here:
5.Side Plank Pose: Vasisthasana
How to do it:
- Start with the Plank pose.
- Put the right palm at the centre under your face.
- Pull your feet together and turn onto the edge of right foot as you stack your left foot on the right one.
- Push right palm firmly on the ground while keeping shoulders firm.
- Lift the left hand up towards the ceiling.
How much should be done: Remain in the pose for 15-30 seconds and repeat by reversing the sides.
How it helps: It strengthens the shoulders and the back and helps you balance your body.
Precautions: In case of wrist or back injury, consult with doctor.
Watch it here:
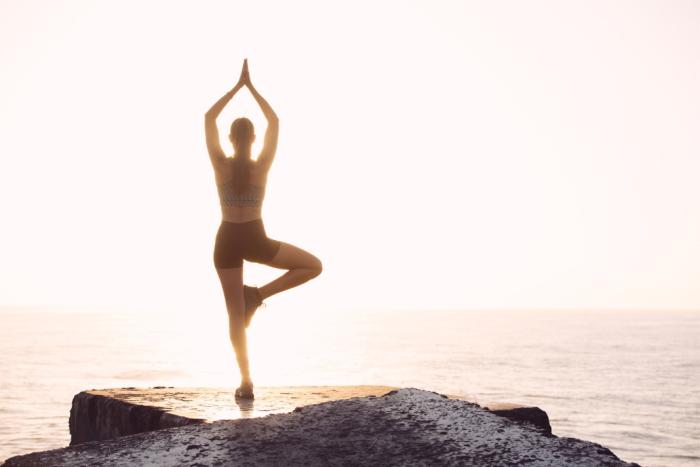
6.Tree Pose: Vrikshasana
How to do it:
- Begin with standing straight pose.
- Shift your weight on left foot and bend your right knee.
- Take hold of your right angle with right hand and press your right heels with inner left thigh.
- Lift the arms up, joining both palms and facing ahead.
How much should be done: Hold the position for 30-60 seconds by taking deep breaths. Repeat by reversing the sides.
How it helps: It straightens the thighs, chest, shoulders along with strengthening the thighs, calves, ankles and spine
Precautions: Seek medical intervention in case of headache, insomnia, low blood pressure. In case of high blood pressure, avoid lifting the arms up.
Watch it here:
7.Downward-facing Dog Pose: Adho Mukha Svanasana
How to do it:
- Lie face down in the floor.
- Press both palms and heels, towards the floor, such that the whole body weight rests on both hands and both feet, while facing down. The distance between knees should be equal to hip width, while distance between palms should be more than shoulder width.
- Pull the belly button towards the spine and breathe through your chest rather than your belly.
- Lift the hips while straightening the legs to come in to the pose.
- Take five deep inhalations and exhalations while keeping the belly pulled in.
How much should be done: Stay in pose for 30-60 seconds.
How it helps: It stretches your back, calves and hamstrings while strengthening the shoulders and arms.
Precautions: Avoid if you have wrist injury.
Watch it Here:
8.Upward Plank Pose: Purvottanasana
How to do it:
- Begin with the Staff Pose : Sit on the floor with legs extended straight in front of your body. The body above the pelvis should be perpendicular with the body below hips.
- Bend both the knees and keep the feet on the floor.
- Exhale and lift your hips upwards by pressing the palms and feet against the floor, so as pushing the floor.
- Keeping the hips up, one by one straighten the knees.
- Lift the hips much higher and then lift the chest.
How much should be done: Stay like this for 30 seconds, exhale and go back to Staff position.
How it helps: Strengthens the muscles of chest, arms, wrists, shoulders and legs.
Precautions: Avoid if you have wrist injury. In case of neck problems, provide support to the head by a wall or chair seat.
Watch it Here: https://www.youtube.com/watch?v=4EuBcJ7ZZHw
9.Upward-Facing Dog Pose: Urdhva Mukha Svanasana
How to do it:
- Lie face-down on the floor keeping your legs straight and tips of the feet on the floor.
- Spread the hands on the floor, bend the elbows such that forearms align perpendicularly with the floor.
- Push yourself forward while pressing the hands towards the floor.
- Inhale deeply, lift the torso and the legs off the floor, while keeping the arms straight.
- Keep the face forward, shoulders firm and lift the top of the chest.
This pose is a part of the Sun Salutation sequence but can be performed separately.
How much should be done: Keep yourself in this position for 15-30 seconds. Keep taking deep inhalations and exhalations. Conclude by lying gently to the floor.
How it helps: It stretches the muscles of arms, wrists, shoulders, chest, buttocks and abdomen. It also stimulates the abdominal organs and improves body posture.
Precautions: If you have headache, back injury, neck problems, carpal tunnel syndrome, or if you are a pregnant women, consult a doctor before attempting this pose.
Watch it here:
10.Dolphin Pose
How to do it:
- Start on all fours. The arms should be apart by shoulder width.
- Bend the elbows and rest your forearms on the floor.
- Lift up the hips by straightening the legs.
- Move your feet towards the elbows as much as you can so that you form an inverted V-shape.
- The neck should be relaxed but the head should not touch the ground.
- Face backwards.
How much should be done: Stay for 30-60 seconds in this position.
How it helps: It stretches and strengthens the entire body-arms, core and legs.
Precautions: Should not be performed in case of wrist injury.
Watch it here:
11.Cobra Pose: Bhujanasana
How to do it:
- Start by lying face down on the floor.
- Extend the arms on the sides, distance between them being more than the mat-width.
- Bending the elbows, press the pelvis, feet and fingertips on the floor,and lift your head up, while keeping the spine straight.
- Lift up your sternum.
How much should be done: Hold the position for 30-60 seconds.
How it helps: It stretches the chest and spine and gives strength to your back.
Precautions: Avoid in case of wrist, back or neck injury.
Watch it here:
12.Boat Pose: Paripurna Navasana
How to do it:
- Sit on the mat with legs straight and press your hands on the floor, fingers pointing at the feet, keeping yours arms straight.
- Lean back, squeezing your pelvic floor muscles and abdominal muscles and bring the belly button towards the spine.
- Bend the knees, lift the sternum and balance yourself on your two sitting bones and tailbone.
- Slowly, lift the feet off the floor while straightening the legs and placing the arms straight in front of you. The thighs should be at an angle of 45-50 degrees relative to floor. The abdominals should remain contracted.
- Lifting the top sternum, maintain the pose by pressing the heads of thigh bones towards the floor and breathe easily.
How much should be done: In the beginning, anchor the pose for 10-20 seconds while taking deep inhalations and exhalations. With time, it can be extended upto 1 minute. Release the legs with a deep exhalation and sit upright.
How it helps: This pose helps in strengthening the abdomen, hip flexors, and spine. It stimulates the kidneys, thyroid and prostate glands, and intestines while relieving stress and improving digestion.
Precautions: Medical supervision or consultation is required while performing the pose in conditions such as, asthma, diarrhea, headache, heart problems, insomnia, low blood pressure, menstruation, pregnancy and neck injury.
Watch it Here:
13.Fish Pose: Matsyasana
How to do it:
- Lie straight, face up on the floor.
- Pull the sternum up towards the ceiling, keeping the top of the head touching the floor.
- Lift the feet off the floor while keeping the knees straight. Pull the belly button towards the spine.
- While keeping the abdominals contracted, take deep inhalations and exhalations.
How much should be done: Stay in this position for 10-15 seconds initially. Gradually time can be increased up to 1 minute.
How it helps: It stretches the abdomens and chest and provides strength to lower abs and hips.
Precautions: People with back and neck problems should seek medical advice before attempting.
Watch it here:
14.Seated Forward Bend Pose: Paschimottanasana
How to do it:
- Sit on the floor with legs extended straight and press the floor firmly with the heels.
- Support your hips by placing cushions, pillows or a folded blanket beneath.
- Press the palms and top thighs firmly on the floor and lift the torso up slightly.
- Inhale and lean the torso forward from hip joints rather than waist. Do not bend the backbone and keep it straight.
- Hold the sides of the feet with your hands, keeping the elbows straight.
If initially, it is difficult for you, then with the help of a strap, make a loop of it around the feet, holding the strap ends in each hand. With regular practise you should be able to lean much further in which case, bend elbows both the sides and lift them up the floor.
- If holding the strap, then release the strap slowly, stretch the arms long and straight towards the heel.
- While leaning the torso forward, the thighs should come in contact with lower belly, upper belly, chest and ultimately head, in that order.
How much should be done: Maintain the pose for 1-3 minutes. Conclude by straightening the elbows and lifting the torso up away from thighs. Inhale and come back to the starting position.
How it helps: It stretches the muscles of back, shoulders and hamstrings, improves functionality of abdominal organs such as liver, kidneys, ovaries and uterus. It also improves digestion and reduce obesity. Additionally, it helps with stress relief, depression, headache, anxiety and high blood pressure.
Precautions: Asthma and diarrhea patients should be extra careful in performing this pose. If you have back injury, consult a doctor.
Watch it Here:
15.Four- limbed Staff Pose: Chaturanga Dandasana
How to do it:
- Start with the Plank Pose. Keep the shoulder blades firm.
- Exhale and lower your body and legs till they are a parallel to the ground but still a few inches above.
- Bring the pubis towards the navel and keep the tailbone firm. The palms should be pressed firmly to the floor.
Lift the head looking forward. - This pose is a part of the Sun Salutation sequence, but can also be peerformed seperately.
How much should be done: Stay in Staff Pose for 10-30 seconds. Conclude by exhaling and lying flat on ground gently.
How it helps: It tones the abdominal muscles and strengthens the arms and wrists.
Precautions: Further consultation by required for people with carpal tunnel syndrome and pregnant women.
Watch it Here:
16.Extended Side Angle Pose: Utthita Parsvakonasana
How to do it:
- Stand straight, exhale and pull both your feet about 3.5-4 feet apart.
- Raise your arms parallel to the floor, palms facing down.
- Bring the left foot in towards the right foot and the right foot towards right making an angle of 90 degrees to the floor.
- Keeping the thighs firm, turn the right thigh outward, aligning the right knee with center of right ankle.
- Bend the right knee over the right angle, keeping the shin perpendicular and right thigh parallel to the floor.
- Extend the left hand up as far as possible and turn the left palm towards the head, reaching it to the back of left ear.
- Exhale and bring the right torso close to the right thigh as much as possible.
- Press the right palm on the floor.
How much should be done: Stay in the pose from 30 seconds upto 1 minute. Pushing both feet towards the ground and inhaling, come up to standing position. Repeat for the same time by reversing the feet.
How it helps: Helps with muscles of abdomen, legs and arms.
Precautions: In case of headache, insomnia, high or low blood pressure, seek medical advice.
Watch it Here:
17.Warrior I Pose: Virabhadrasana
How to do it:
- Stand in Mountain Pose : Stand straight. Pull your legs and feet together. Keep arms at the sides with palms facing forward. The back should be straight and shoulders pulled back from ears. The weight of the body should be all all four corners of feet.
- Pull your feet apart by 3.5-4 feet while exhaling.
- Raise both arms parallel to each other and perpendicular to the floor.
- The left foot should be turned to right 45-60 degrees and right foot towards right by 90 degrees.
- Rotate the torso to the right, while exhaling and arching the upper torso back slightly.
- Press the left foot firmly to the ground and exhale. Pressing the right knee over the right ankle, bring the shin perpendicular and right thigh parallel to the ground.
- Bring the palms towards each other.
- Lifting the ribs away from pelvis, stretch the arms up as much as possible.
- Face forward or tilt to look at the palms.
How much should be done: Maintain yourself in this position for 30-60 seconds. Inhale, press the feet firmly on the ground, straighten the knees and and come up. Repeat by reversing the sides.
How it helps: This pose helps us stretch the muscles of thighs, ankles, chest, arms, back and belly.
Precautions: Proceed with caution if you have heart condition or high blood pressure. People with neck problems should not lift the head up and keep facing forward. People with shoulder problems should avoid joining the palms and keep the arms parallel to each other.
Watch it Here:
18.Warrior II Pose: Virabhadrasana II
How to do it:
- Start by doing the Mountain Pose: Stand straight. Pull your legs and feet together. Keep arms at the sides with palms facing forward. The back should be straight and shoulders pulled back from ears. The weight of the body should be all all four corners of feet.
- Exhale, and pull both the feet 3.5-4 feet apart.
- Then raise both the hands straight, parallel to the floor and keep the hands facing down.
- The left foot should be turned to right 45-60 degrees and right foot towards right by 90 degrees.
- Press the left foot firmly to the ground and exhale. Pressing the right knee over the right ankle, bring the shin perpendicular and right thigh parallel to the ground.
- The left leg should be placed firmly on floor and kept straight and strengthened.
- Do not lean over either side and keep the torso long and balanced over the pelvis.
- Turn head facing the right.
How much should be done: Anchor the position from 30-60 seconds. Inhale, and repeat by reversing the feet, for the same amount of time.
How it helps: It gives strength to muscles of legs, ankles, chest, shoulders and makes the abdominal organs perform more efficiently. Also increases the stamina.
Precautions: Proceed with caution if you are dehydrated by diarrhea, or have a high blood pressure. If you face problems of neck injury, avoid turning head to either side and keep looking straight.
Watch it Here:
19.Bow Pose: Dhanurasana
How to do it:
- Lie face down on the floor, feet hio-width apart and arms straight by your sides.
- Bend the knees, lift your feet up.
- Inhale and lift your sternum off the ground, pull your hands back and hold your ankles, such that your body is curved like a bow.
- Face forward and take deep breaths.
How much should be done: Stay in this position for 15-20 seconds. Return by releasing the hands and ankles, exhale and bring your chest and legs to the ground.
How it helps: It stretches the spine legs, arms while strengthening the abdominal and back muscles
Precautions: Care should be taken if you have neck or back injury, headache, migraine or high blood pressure
Video: https://www.youtube.com/watch?v=FCuSE4oS9xc
20.Cat Cow Pose: Marjaryasana-Bitilasana
How to do it:
- Start on your hands and knees with palms pressing on the floor. Arms should be perpendicular to the floor and knees should be directly beneath the hips, head facing down.
- Inhale and lift your chest and head up towards the ceining, while dropping your belly down. This is the Cow Pose.
- Exhale and lift your belly up towards the ceiling, rounding your back and face down. This is tha Cat Pose.
- Keep the Flow by doing Cow Pose during inhalation and Cat Pose on exhalation.
How much should be done: It is beneficial to perform it 10-20 times.
How it helps: It stretches the spine, front and back torso and nech.It strengthens abdominal organs.
Precautions: In case of neck injury, do not lift your head up or down.
Watch it Here:
Conclusion
The above yoga poses are great for strengthening of body muscles and body balance if performed consistently. They have therapeutic advantages as well and help in recovery.
They increase body flexibility, lengthen the muscles and burn up calories in the process.
So, if you looking for a serious weight loss regime, without strenuous exercises, regular yoga practices with consistency is your solution. But do not forget the 3D’s of weight loss- Discipline, Determination and Dedication.